Timber frame prefabrication workshop: the workflow from plan to delivered panel
In short
A timber frame prefabrication workshop turns a plan into delivered panels in ten steps: plan check, take-off and quote, design, panel layout, shop drawings, cutting, assembly on the table, closing the panel, windows and storage, transport and installation. Most hours are lost in steps 1 to 5, where the same plan is read, re-measured and redrawn by different people. Stud covers that front end: plan to 3D model, panels, framing and quantities.
Offsite timber frame panels are built the same way in most workshops, yet two shops with the same saws and the same people can differ widely in hours per house. The difference is rarely on the assembly table. It is in what happens before the saw starts. Here is the workflow, who does what, and where the hours go.
What are the steps of a timber frame prefabrication workshop?
From the plan received to the panel installed, a timber frame prefabrication workshop goes through ten steps. Steps 1 to 5 happen at a desk, steps 6 to 10 on the shop floor and the road.

- Receive and check the plan. DXF, PDF, plan image or dimensioned sketch. Check wall heights, sill heights, floor levels and which walls carry loads. List what is missing and ask once, in writing.
- Take off and price. The company counts timber by section and the areas of sheathing, membranes and insulation, then prices them with its own rates. The method is in how to price a timber frame house from plans.
- Design. Build the model: walls, openings, stud spacing, sections, corner and junction rules. This is where lintel sections from your engineer go in.
- Lay out the panels. Fix the maximum width, place the joints outside the openings, number the panels. See the panel layout guide.
- Draw the panels. One sheet per panel: mark, member lengths, openings, sheathing, orientation. See timber frame panel shop drawings.
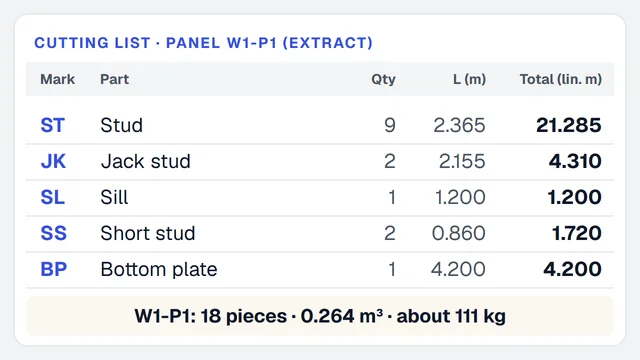
- Cut. A cutting list grouped by section and length, sawn in batches, each piece marked with its panel.
- Assemble on the table. Plates and studs laid out, openings framed, nailed, squared and checked.
- Close the panel. Racking sheathing fixed, then breather membrane and vapour control layer, and insulation for a closed panel.
- Fit windows and store. Windows are fitted in the shop or on site; panels are racked and marked.
- Transport and install. Load in the reverse order of installation, lift, fix, seal the joints.
Who does what, and with what?
| Step | Who | With what | Hands over |
|---|---|---|---|
| 1. Plan check | Estimator or project lead | Plan files, a list of questions | A plan you can build from |
| 2. Take-off and price | Estimator | Spreadsheet, estimating software or a 3D model | Quantities, then a price |
| 3. Design | Design office, draughtsperson | CAD or a 3D model, engineer's sections | A frame model |
| 4. Panel layout | Design office, shop lead | The model, shop and transport limits | Panel list with marks |
| 5. Shop drawings | Design office | The model, a panel sheet template | One sheet per panel |
| 6. Cutting | Saw operator | Cutting list, saw, labels | Marked pieces |
| 7. Assembly | Framers | Table, nail guns, the panel sheet | Open panels |
| 8. Closing | Framers, finishers | Sheathing, membranes, insulation | Closed panels |
| 9. Windows, storage | Shop and logistics | Racks, panel marks | Panels ready to ship |
| 10. Transport, installation | Logistics, site crew | Truck, crane, loading plan | Panels in place |
In a small shop, one or two people do steps 1 to 5. That is the point to look at: the same plan passes through the same hands five times, each time in a different form.
Where does a workshop lose hours?
The assembly table is usually the best-run place in the building. The hours go elsewhere:
- Re-entry. Quantities typed into the estimate, then again into the design software, then again into the cutting list. Every copy is a chance for a different number.
- Redrawing. The plan is redrawn in CAD to get a model, often before the job is won. When the job is lost, the drawing is wasted.
- Late changes. The client moves a window. The estimate, the panel layout, the sheets and the cutting list each need the change, found by hand.
- Missing dimensions found at the table. A sill height nobody gave, a wall height read off a section. The cost is a panel to rebuild, not a line in a spreadsheet.
- Different names for the same piece. The estimate says "trimmer", the sheet says "jack", the saw operator says "stud 2155". A shared list by mark and length removes the arguments.
- A cutting list that does not know the panels. Pieces cut by section and length with no panel mark are sorted by hand afterwards.
None of this needs a better saw. It needs the plan read once and the model reused.
What should be decided before cutting starts?
Settle these once for the shop, then apply them to every job. They are what turns a plan into the same kind of model each time:
- Maximum panel width, from the table, lifting equipment, truck and site access.
- Stud spacing and section, with your engineer.
- Lintel sections by opening size, from your engineer.
- Corner and junction rules: which wall runs through, how many extra studs.
- Plate rules: one bottom plate, a double top plate, where joints in plates fall.
- Opening rules: rough opening versus window frame size, blocking, king studs shared or not. The openings guide covers the pieces.
- Open or closed panels, and what is fitted in the shop.
- Marking: one convention for level, wall and panel number, written on the sheet and on the panel.
How do you find your own bottleneck?
You do not need a study to find where your shop loses time. Pick three recent jobs and answer five questions, step by step:
- How many hours did each of the ten steps take, from the plan received to the panel loaded? Write them on one line per job.
- How many times was each dimension typed or drawn: wall length, sill height, opening width? More than once is a re-entry.
- How many changes arrived after the panel sheets were issued, and how many documents did each one touch?
- How many panels were rebuilt or recut, and was the cause a missing dimension, a wrong dimension or a late change?
- Which step waited for which: the saw for the sheets, the sheets for the layout, the layout for the model?
The answers are your shop's own, with no benchmark needed. If the longest line is steps 2 to 5, the gain is at the desk and the fix is to read the plan once. If it is steps 7 to 9, look at the table, the stock of sheathing and the crane time. The workflow just tells you where to look.
Open or closed panels: what changes?
An open panel is the frame and its racking sheathing; insulation and membranes are fitted on site. A closed panel also carries the membranes, the insulation and sometimes the windows. Closed panels move more work into the shop, which is easier to control, but they weigh more, which can bring the maximum width down. The choice sits in step 4, because it changes what the table, the crane and the truck can take. The same wall may be cut into wider panels when open and narrower ones when closed.
Where does Stud fit in the workflow?
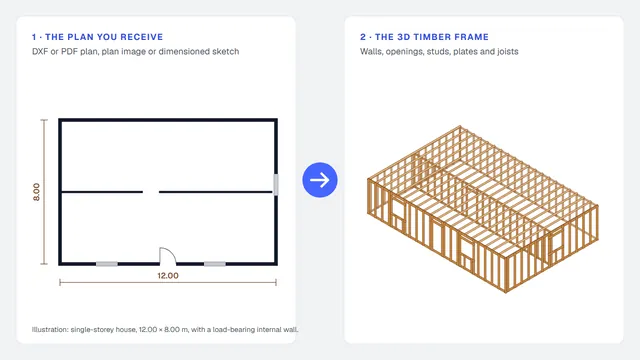
Stud works on steps 1 to 5. You give it the plan you received; the agent builds the volume in 3D, splits the walls into panels, draws the framing and gets the quantities from the same model. It flags a standard value when a dimension is missing, and you read and correct the result. The quantities are quantities, not prices: step 2's price stays your own. If a client changes a window, you ask for the change and the model, panels and quantities follow, rather than three documents to fix by hand. The sheet per panel of step 5 comes with the Framer offer (production PDF); the free beta does everything in the app, without export.
From step 6, the shop floor takes over, with the panel sheets from the model and the shop's own cutting list. For shops that build in both materials, light gauge steel versus timber frame panels compares what changes in the workflow when the frame is steel.
Doing it with Stud, from the plan to the panel sheets
Stud is an AI agent that covers the front end of this workflow, the part that comes before the saw:
- you upload a DXF or PDF plan, a plan image or a dimensioned sketch; the agent builds the building in 3D and uses a standard value, flagged for you, for any dimension that is missing;
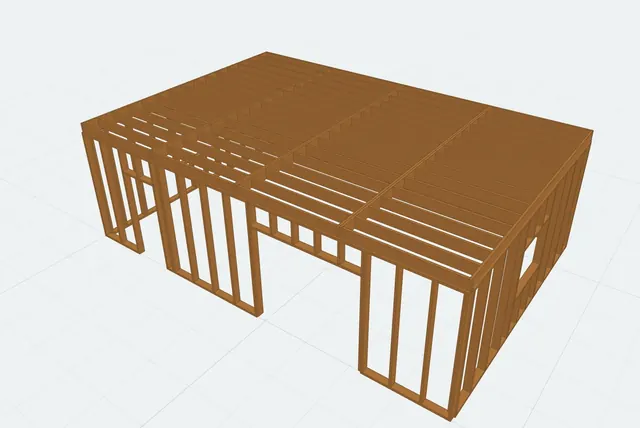
- it splits the walls into panels at the maximum width and stud spacing you set, and draws the framing: plates, studs, lintels, joists;
- the take-off comes from the same model: areas, openings, timber volume and weight, so the quantities and the panels never disagree;
- you click an element in the 3D view and ask for a change; the model, the panels and the quantities follow.
Stud doesn't calculate prices, doesn't size structure and doesn't produce machine files for timber saws. The Framer offer adds IFC (architecture, framing, panels) and a production PDF with a framing plan per level and a sheet per panel; the free beta does everything in the app, without export.
Free beta: sign up and try it on one of your own plans. Compare the panel list with the one your shop would draw.
Related guides
 DXF, PDF or image: which plan to use for a timber frame take-offWhat each format lets you measure, the unit and scale traps, and how to prepare the plan before you count.
 Timber frame cutting list: from the framing to the pieces to cutColumns, grouping by panel and by section, stock lengths and offcuts, with a worked 8 m wall.
 Timber frame estimating and design software: what to use at each stageSpreadsheets, timber CAD/CAM, PDF takeoff tools and AI agents, sorted by stage, with a comparison table and a worked example in hours.