How to price a timber frame house from plans: a 6-step method
In short
Pricing a timber frame house from plans means turning the architect's drawings into quantities of timber, boards and membranes, then applying your own prices to those quantities. Work from the outside dimensions of the frame, take off each wall (length, gross and net area, studs), add the extra timber around each opening, then floors and roof. Turn linear metres into m³ per section, add waste, and only then apply your own prices and labour ratios: every line of the price should point back to a quantity, and every quantity to a written assumption.
Pricing a timber frame house comes down to the take-off. The architect's drawings give you rooms, floor areas and internal dimensions; you need wall lengths, openings, linear metres of timber per section and sheathing areas. Here is a six-step method to get from one to the other without missing anything, followed by a full worked example.
What to pull from the plan before you price
Before you count a single stud, list what the price needs. The drawings hold part of it; the rest is your own build-up, and it's worth writing it down from the start.
- Footprint and external perimeter: the length of each external wall, measured to the outside face of the frame.
- Heights: the overall wall height (not the ceiling height), number of storeys, floor zone depths.
- Load-bearing and internal walls: which ones carry the floor or roof (framed in your standard section) and which are non-load-bearing partitions, priced separately.
- Openings: width, height and sill height of every window, door and glazed opening.
- Floors and roof: type (flat roof, trussed or cut roof), span direction, intermediate supports.
- Your build-up: stud section, stud spacing (centres), number of plates (with or without a sole plate fixed to the slab under the panels, a sill plate in the US), racking sheathing. The drawings don't say: it's your standard, and it should be the same on every job.
Step 1: check the plan and list missing dimensions
Most pricing errors come from a dimension read wrongly or not there at all, not from bad arithmetic. Spend five minutes checking the plan:
- do the running dimensions along each elevation add up to the overall dimension?
- are they internal (room) or external (structure) dimensions? For the frame, you need the outside face of the walls;
- does every window have a height and a sill height? Planning drawings rarely show them;
- does the drawn wall thickness match your build-up (frame, insulation, linings)?
- for an image or a scan, can you check the scale against a known dimension?
Each missing dimension should become either a question to the client or an assumption written on the quote. A "standard" value slipped in without saying so is a gap you'll find on the shop floor.
Step 2: wall take-off
Work wall by wall, in the same order on every job (clockwise from the front door, for instance). For each wall, note the length, the overall height, the gross area (length × height), then the net area (gross area minus openings).
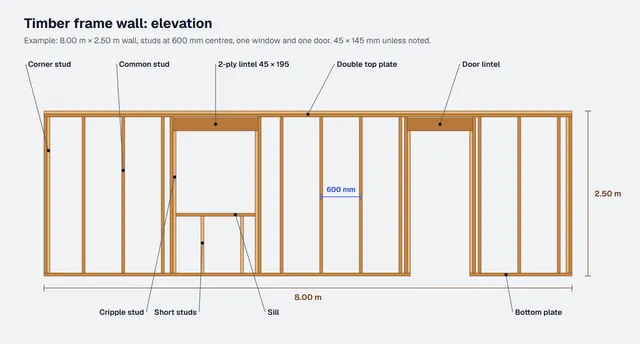
For the frame, the number of common studs in a wall is its length divided by the stud spacing, rounded up, plus one. On an 8.00 m wall at 600 mm centres: 8.00 / 0.60 = 13.33, rounded up to 14, plus 1, so 15 studs. Then add the corner studs, the studs at internal wall junctions and the studs either side of each opening. The full counting method is in our timber frame wall take-off guide.
In the US, the same rule applies with 2×4 or 2×6 studs at 16 or 24 in. on centre (o.c.): a 26 ft wall at 16 in. o.c. gives 26 × 12 / 16 = 19.5, rounded up to 20, plus 1, so 21 studs.
Keep a sanity-check ratio: linear metres of framing timber per m² of gross wall. In the example below, it comes to about 3.6 lin. m of 45 × 145 per m² of external wall. Work out your own from your last few jobs: it doesn't replace the take-off, but it catches a gross error in ten seconds.
Step 3: openings and their framing
An opening takes area away from the sheathing, but it adds framing timber. For each opening, count:
- two full-height studs, one on each side;
- two cripple studs (jack studs in the US) under the lintel;
- one lintel (header), often two plies for short spans;
- for a window, a sill and short studs under the sill, in place of the common studs that were cut.
Large glazed openings fall outside any ratio: their lintel has to be designed (often glulam or LVL) and priced separately, once your engineer has sized it.
Step 4: floors and roof
For a joisted floor or flat roof, the rule is the same as for walls: number of joists per bay = length to cover / joist spacing, rounded up, plus one. A joist is the span plus its bearings. Add rim joists, trimmers around openings and noggings or blocking if your detail calls for them.
For a cut roof or trussed rafters, price it the way you usually do; just make sure you don't count it twice with the ceiling joists.
Step 5: sheathing and membranes
Racking sheathing, breather membrane, vapour control layer and insulation are priced on the net wall area, plus a waste allowance. The number of boards depends on your board layout: a 2.50 m high wall in 2.50 × 1.25 m boards doesn't produce the same offcuts as a 2.70 m wall.
Step 6: from quantities to a price
Once the quantities are out, the price is built in four blocks:
- Materials: linear metres converted to m³ (length × section) and multiplied by your price per m³; boards and membranes per m²; fixings and connectors.
- Factory or shop labour: your hours per m² of wall or per panel, measured on past jobs.
- Site erection: crew, duration, crane.
- Transport, overheads and margin.
Your ratios are what make the price right. The take-off itself must be exact and repeatable: it's the part you can get straight from the drawings.
Worked example: a 96 m² single-storey house
The assumptions below (sections, spacing, labour ratios) are example values to show the method: replace them with your own. Sections and spacing must be checked by your structural engineer. The prices are yours: they're not shown here.
Assumptions. Rectangular house, 12.00 × 8.00 m (external dimensions), 2.50 m walls, 45 × 145 mm studs (close to a US 2×6) at 600 mm centres, one bottom plate and a double top plate (studs 2.365 m long). Six 1.20 × 1.25 m windows (0.95 m sill height), one 0.90 × 2.20 m front door, one 2.40 × 2.20 m glazed opening. One load-bearing internal wall down the middle, counted as 12.00 m for simplicity (it is 11.71 m between the inside faces of the external walls), with two 0.90 × 2.20 m doors. Flat roof: 45 × 220 joists at 600 mm, in two 4.00 m spans bearing on the internal wall.
The quantities
| Item | Quantity | Volume |
|---|---|---|
| External walls, 45 × 145 framing | 355.54 lin. m | 2.32 m³ |
| Internal load-bearing wall, 45 × 145 framing | 97.22 lin. m | 0.63 m³ |
| 2-ply 45 × 195 lintels (excluding the glazed opening) | 21.42 lin. m | 0.19 m³ |
| Roof and rim joists, 45 × 220 | 192.00 lin. m | 1.90 m³ |
| Solid timber, net | 5.04 m³ | |
| Solid timber with 10% waste | 5.55 m³ | |
| Glazed opening lintel (glulam, to be designed) | 1 piece | — |
| External walls: gross / openings / net area | 100.00 / 16.26 / 83.74 m² | |
| 12 mm OSB racking sheathing (net + 10%) | 92.1 m² | |
| Breather membrane (net + 15% laps) | 96.3 m² | |
| 18 mm OSB roof deck (96 m² + 10%) | 105.6 m² | |
The net timber weighs about 2.1 t, based on the mean density of C24 softwood (420 kg/m³ in EN 338). US lumber species differ: use your supplier's figure.
From quantities to a price: the build-up
Each line of the price starts from a quantity in the table, multiplied by your buying price or your labour rate:
| Item | Basis |
|---|---|
| C24 solid timber | 5.55 m³ × your price per m³ |
| Glazed opening lintel | price of the piece, once sized |
| 12 mm OSB walls | 92.1 m² × your price per m² |
| 18 mm OSB roof | 105.6 m² × your price per m² |
| Breather membrane | 96.3 m² × your price per m² |
| Fixings and connectors | a percentage of materials, measured on your jobs |
| Factory labour | 142.4 h × your hourly rate |
| Site erection | 3 people × 3 days × 8 h = 72 h × your hourly rate |
| Transport and crane | lump sum based on distance and lifting |
| Cost | sum of the lines |
| Selling price | cost × your mark-up |
The factory hours come from two example ratios: 0.8 h per m² of gross wall (130 m² of external and internal load-bearing walls) and 0.4 h per m² of roof (96 m²). This build-up covers the frame package only: no insulation, windows, roofing membrane, flat roof falls or foundations.
What matters in this example is traceability: every line of the price points back to a quantity, and every quantity to a written assumption. If the client changes a window, you know exactly which lines move.
Common mistakes
- Pricing per m² of floor area with a single ratio. An L-shaped house or one with large glazed openings doesn't have the same ratio as a rectangle.
- Deducting openings from the framing timber. They reduce sheathing areas, but add studs, cripple studs and lintels.
- Forgetting corners and internal wall junctions. A few studs per wall, but across a whole house it shows.
- Mixing up ceiling height and wall height. The floor zone and the plates change the stud length.
- Filling in a missing dimension without writing it down. The assumption belongs on the quote.
- Ignoring waste and stock lengths. Timber is bought in stock lengths, not by the exact metre.
- Redrawing the whole project once you win it. If the take-off comes from a model, that model should feed production. Going from floor plan to 3D model at the pricing stage gives you that model.
References
- EN 1995-1-1 (BS EN 1995-1-1 in the UK), Eurocode 5: Design of timber structures, Part 1-1: General, Common rules and rules for buildings: the design standard behind the sections and stud spacing you count. Overview on the European Commission's Eurocode 5 page.
- NHBC Standards, chapter 6.2, External timber framed walls: NHBC's technical requirements for the external walls of timber framed homes in the UK.
Doing it with Stud, without redrawing the plan
Stud is an AI agent that handles steps 1 to 4 from the plan you receive, and gives you the areas for step 5:
- you upload a DXF or PDF plan, a plan image or a dimensioned sketch, with your instructions (wall height, timber frame);
- the agent builds the building in 3D and, when a dimension is missing, uses a standard value and flags it for you;
- it gives you the quantities: wall, floor and roof areas, timber volume and weight;
- once you win the job, it splits the walls into panels and draws the timber frame from the same model.
Step 6 stays yours: Stud doesn't calculate prices and doesn't do structural design. You apply your ratios to the quantities.
200 free credits, no card required. Upload the plan of the job you're pricing this week.
Related guides
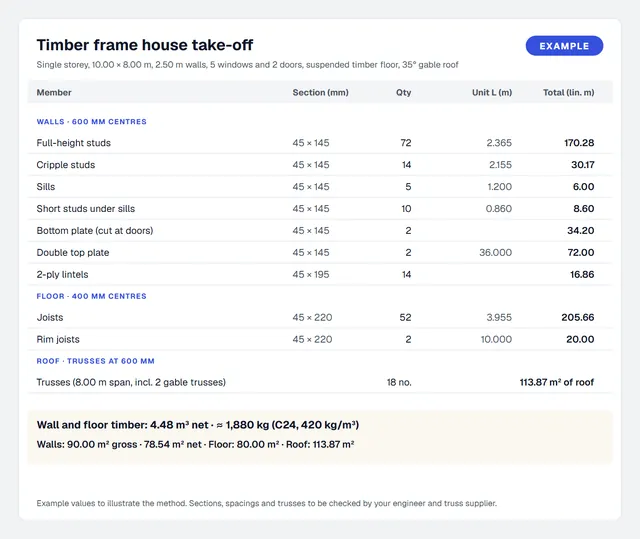 Timber frame take-off from a 2D plan: walls, studs and roof trussesWalls, floor joists and roof trusses, counted from one plan. Worked example on a 10 × 8 m house.
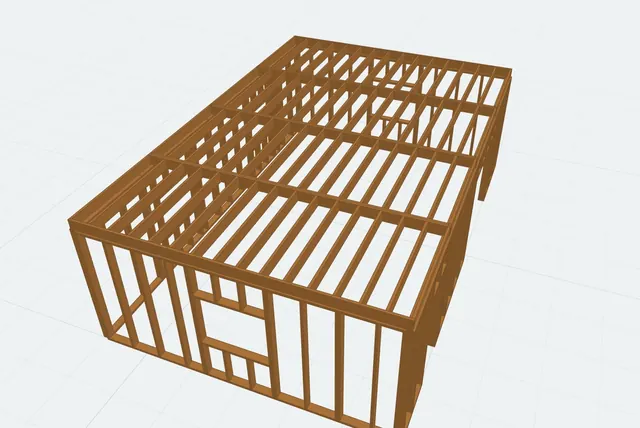 Stud spacing 400 vs 600 mm (16 vs 24 in. o.c.): what it does to the take-offHow many extra studs, m³ and kg at 400 mm centres, and what the stud size adds. The 8 m wall recounted piece by piece.
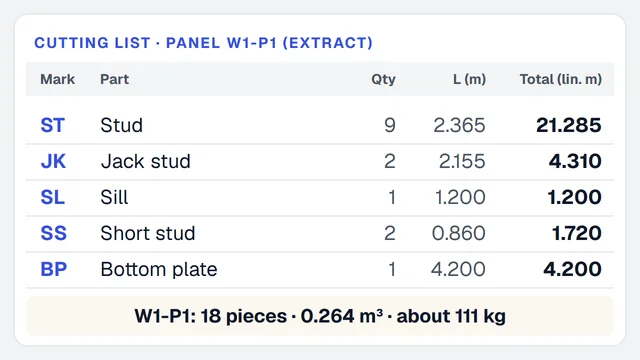 Timber frame cutting list: from the framing to the pieces to cutColumns, grouping by panel and by section, stock lengths and offcuts, with a worked 8 m wall.